Introduction | Why | Missions | Tutorial | FIP | Once
|
|
|
| Example flight expand (Part4)
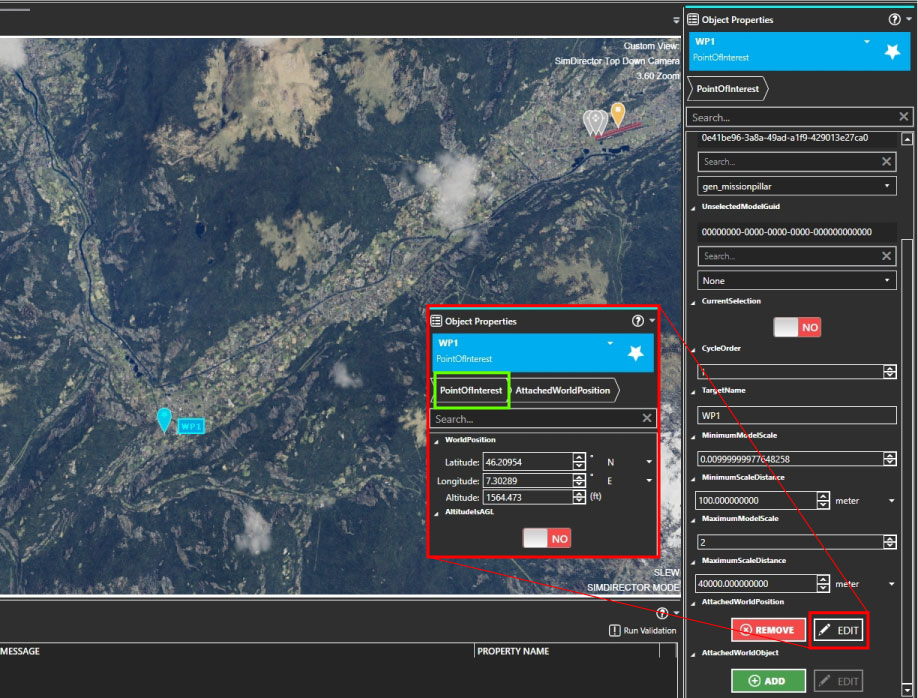
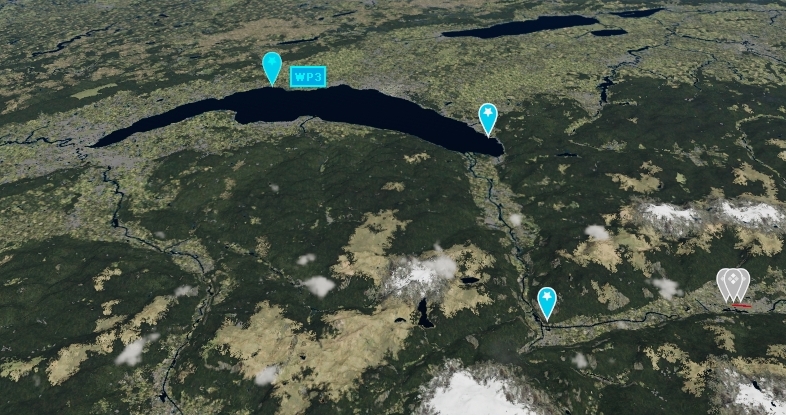
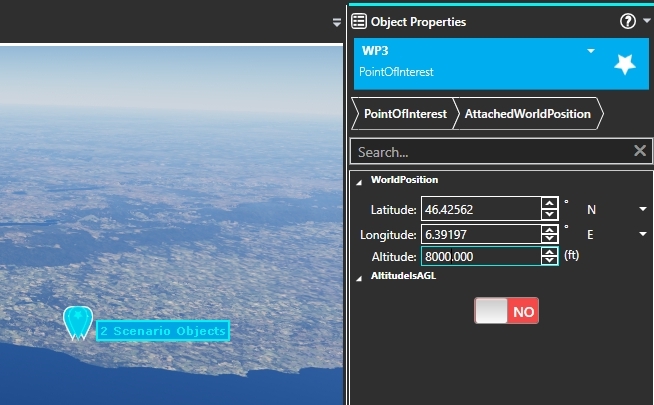
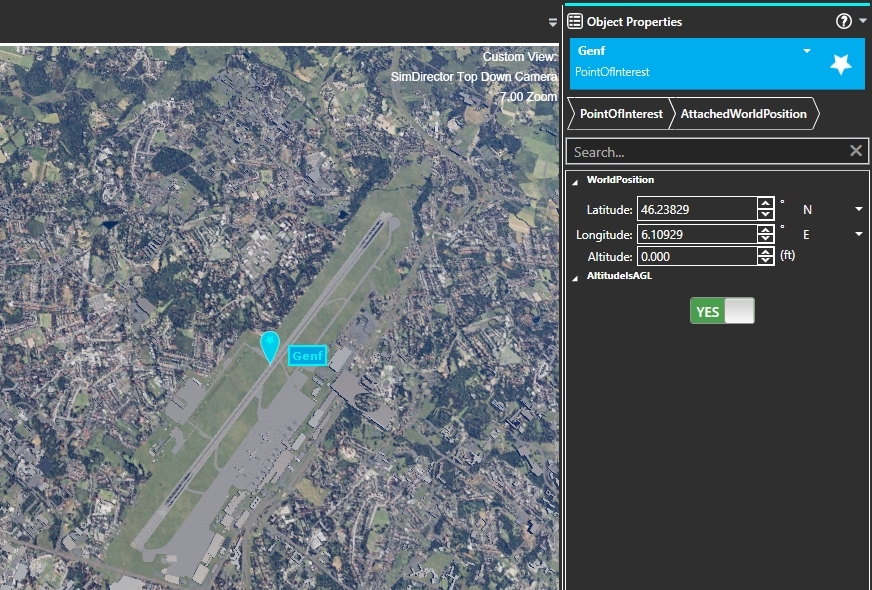
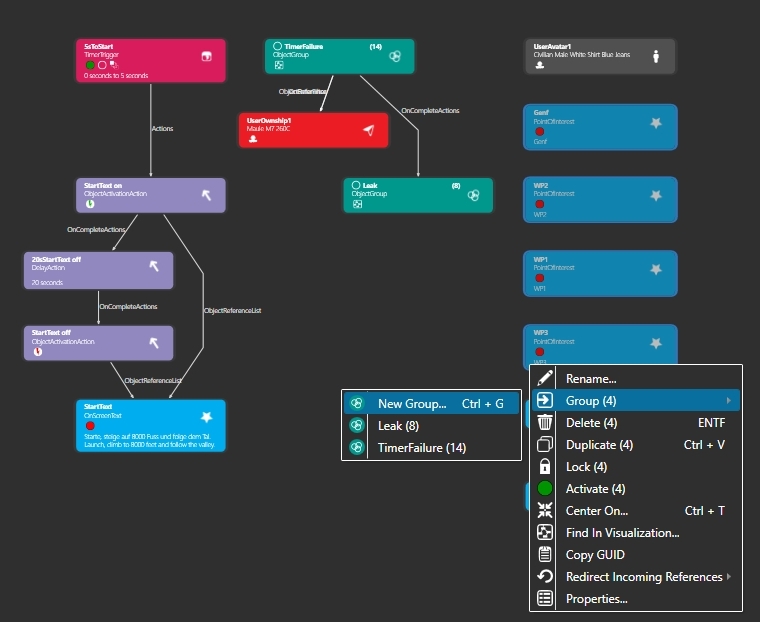
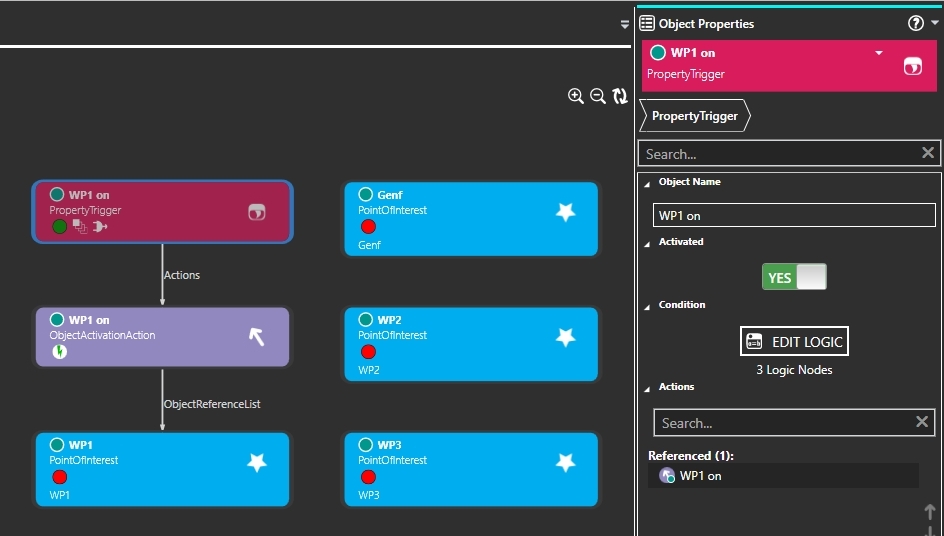
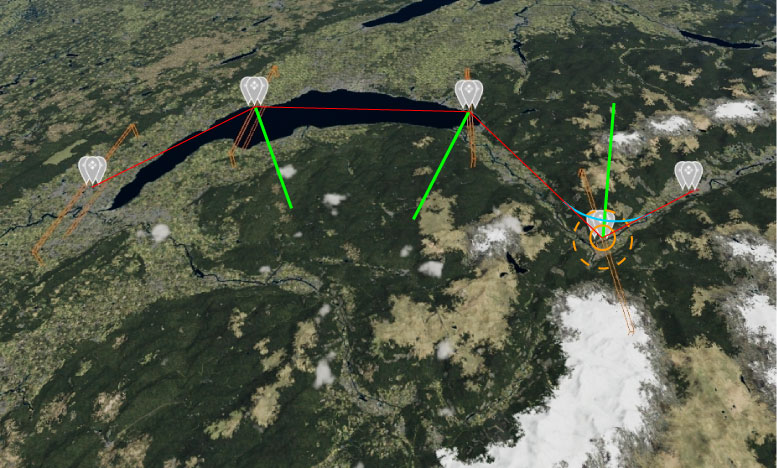
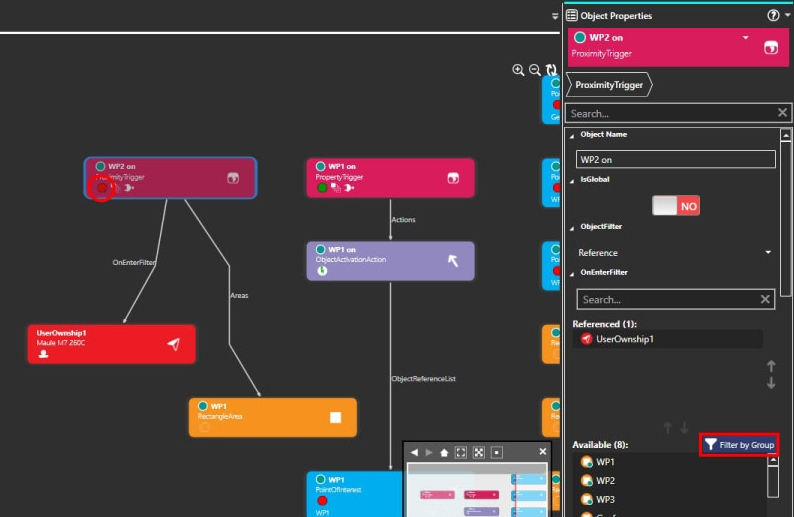
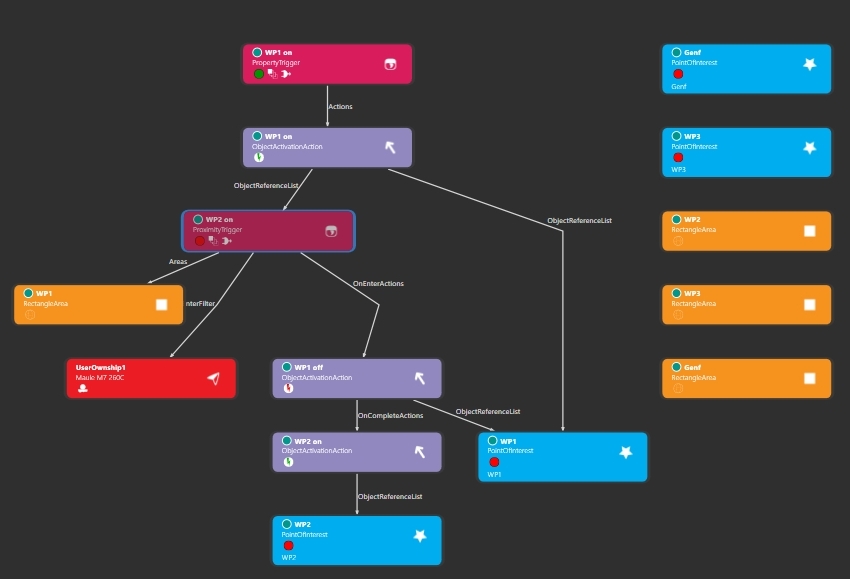
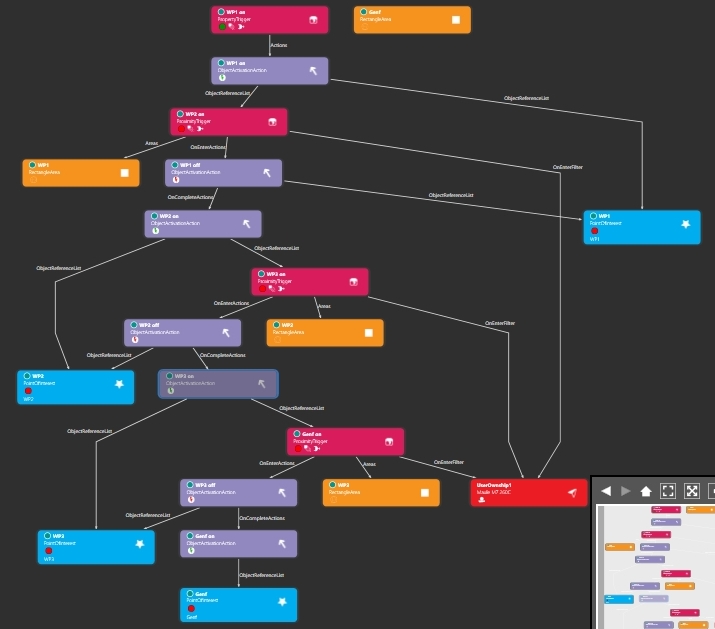
You have tested the flight and found out that according to the flight plan you have to turn 180 degrees right after takeoff? Start the SimDirector and load the "ExampleFlight". POI (Point Of Interest) are now created for the flight plan created earlier. These POI show the next waypoint in the mission compass. Search in the catalog under Scenario the object "PointOfInterest" and drag it with pressed mouse button into the Prepar3D window. - Enter "WP1" in the right window under Object Name. Now copy the values for Latitude and Longitude, which you have determined in the Flight Planner and saved in the Windows Editor (Latitude 46.1060864348739 / Longitude 7.07606869358841). Don't be surprised, the last few numbers after the decimal point will be shortened, but the positioning is still accurate enough. At AltitudeAGL switch to "NO", so that the altitude is given "above sea level" (at YES "above ground level"). At Altitude you now enter 8000, because the maw will rise to 8000 feet above sea level. By clicking on "PointOfInterest" (green rectangle) the right window returns to the "normal" settings of the POI. If everything has been done correctly, the POI has placed itself exactly in the valley bend. Switch to Visualization in the main window, select the PointOfInterest named WP1 and duplicate it. Name the duplicate "WP2", enter "2" for CycleOrder, enter "WP2" for TargetName, click on "Edit" for AttachedWorldPosition and enter the corresponding values of WP2 for Latitude and Longitude (46.4039793036219 / 6.89994440866826). Select the PointOfInterest named WP2 and duplicate it. Name the duplicate "WP3", enter "3" for CycleOrder, enter "WP3" for TargetName, click on "Edit" for AttachedWorldPosition and enter the corresponding values of WP3 for Latitude and Longitude (46.4256205164096 / 6.3919741268829). If you have done everything correctly, you will see in the main window, under the tab "Prepar3D" the 3 POI as in the picture. Another POI is still missing, the runway at Geneva airport. Switch to Prepar3D in the main window. You will see 2 POI at exact same position (WP3 and Geneva), to separate them click in the right window at AttachedWorldPosition on Edit and change at Altitude the altitude to 1000. Now you can grab the POI "Geneva" with the mouse and move it to Geneva Airport. The airport is located at the end of Lake Geneva, easy to find. Once the POI is at the airport, set AltitudeAGL to YES in the right window and enter "0" for Altitude so that the POI is at ground level. Place the POI in the middle of the runway. In the main area, switch to Visualization and select the 4 POIs: Draw a frame around the 4 objects, or click on the individual objects by holding down the control key (Ctrl or Ctrl, depending on the language of the country this key is called differently). Then right-click on Group (4) / New Group to create a new group and name the new group "POI". The waypoints must now be activated at the right moment. I activate WP1 with a PropertyTrigger. Search for it in the Catalog under Triggers and drag it into the visualization window. Name the trigger "WP1 on" and click on "EDIT LOGIC" under Condition. In the main area click on "Create Logical Expression Tree". Click the newly created object on the right, select Change Type, Greather Than in the menu. In the left newly created object, under Change Type, select Property. WP1 should be activated as soon as the plane takes off. Because the property list is long, first write "alt" in the input field for Property Filter. Search and select "PLANE ALT ABOVE GROUND". ("PLANE ALTITUDE" would not work here, because that evaluates the altitude above sea level and the airport is 1585 feet above sea level, the trigger would fire immediately). For "Units:" you can leave "default units", because default is feet. Click the right object and write "20" at Value. Switch the main window to Visualization and drag an ObjectActivationAction from the Catalog, Category Actions into the Visualization window. Name the action "WP1 on" and under ObjectReferenceList, get the PointOfInterest named "WP1" in the Referenced field. In the Visualization window, select the PropertyTrigger named "WP1 on" and under Actions, get the ObjectActivationAction named "WP1 on", in the Referenced field. If everything is done correctly, it will look like in the image below. If you feel like it, you can test the PropertyTrigger function in SimDirector. Be sure to save before doing so. Switch to Mode in the upper ribbon and select Preview Scenario. A small "flight window" is sufficient, select the PropertyTrigger in the visualization window and click on INSPECT LOGIC in the right window. Click on the Prepar3D window, deactivate the pause with "P" and start. The mission compass will be displayed as soon as the aircraft is 20 feet above the ground. Next, WP1 must be turned off as the aircraft approaches waypoint 1 and WP2 turned on instead. Clearly, WP2 needs to have WP3 turned on, and WP3 needs to have the Geneva destination turned on. For this we use Areas. Since the areas should have exactly the same position as the waypoints (PointOfInterest), we save ourselves the trouble of placing these areas manually in the Prepar3D view. Switch to "Visualization" in the main area and go to the "POI" group. Search for "RectangleArea" in the "Areas" category on the left side of the catalog and drag it into the visualization window. - Name the area "WP1". This area is used as a pattern for WP2, WP3 and Geneva: Switch the main area to Visualization and duplicate the area "WP1". - Duplicate "WP2" and follow the pattern above: Rename to "WP3", adjust Latitude and Longitude to "WP3". - Duplicate "WP3" and proceed according to the above pattern: Rename to "Geneva", adjust Latitude and Longitude to "Geneva". The result should look like this: Aside: The areas must now be "rotated" so that they are each the "angle bisector" (green in the picture above) of the flight plan (red in the picture above). Because an area and a POI are close to each other, you cannot select the area separately from the bird's eye view. Therefore switch the left pane to the "Objects" tab (1), there you can select the area "Wp1" (2). Click on Rotate (3) in the menu bar and rotate the area in the desired direction (green ring). Rotate also the areas "Wp2" and "WP3" accordingly. For the area "Geneva" zoom in close and align the area to the runway. In the right window change the value at Lengt to "4000" and Height to "500". At this point a few remarks: 1) The further this tutorial progresses, the more concise the instructions become. 2) Not every step is shown with pictures, because by now you should be able to do many things. 3) Some objects can have the same name, e.g. "WP1 on", but one object is a trigger, the other an ObjectActivationAction. You can distinguish them by their color. So if the trigger "WP1 on" is to be used, it is red, in contrast to an ObjectActivationAction, which is purple. You can also look up the colors in the catalog at any time: To make the Areas switch the waypoints, ObjectActivationAction and ProximityTrigger are needed. First the ProximityTrigger: Next the 2 ObjectActivationAction: 2nd Action: Duplicate the ObjectActivationAction named "WP1 on" again. Final links: This is how it should look in the end. What happens here: Now the whole thing has to be duplicated for "WP3". Other shortcuts: If you did everything right, it looks like this now. Now the whole thing must be duplicated for "Geneva". Select the following 3 objects, duplicate them and rename them: Other shortcuts: The last thing to do is to duplicate 2 objects so that the POI "Geneva" is turned off when approaching the airport. Select the following 2 objects, duplicate them and rename them: Further links: Leave the POI group by clicking on "Grouped Graph" in the upper left corner of the visualization window. Edit the "StartText". Replace the existing text: "Starte, steige auf 8000 Fuss und folge dem Tal. With the following text: "Starte, fliege nach dem Abheben eine 180 Grad Kurve nach rechts. (Be sure to insert line breaks as shown above. The text has 5 lines). Now you can save the mission, exit SimDirector and test the flight in Prepar3D. If everything was done correctly, the POI will switch to the next waypoint on the way and the POI "Geneva" will be switched off just before landing. Of course there are still a few things missing, because the mission is not counted as accomplished, because originally a landing in Sion is planned because of the oil leak. This will be added in the next part. Here you can download the zip with the current mission. Just copy the contained files into the save directory. |
|
|
Continue with part5: Example flight expand (Part5)
|
|
|
I hope you enjoy these flights, if so, please give feedback to p3d@andi20.ch. Also send error messages (spelling mistakes, wrong information, etc.) to me, I appreciate any feedback. |
|
| Introduction | FlightCreate | MissionCreate | MissionExpand | MissionComplete ||||| MissionExpand 1 | 2 | 3 | 4 | 5 | 6 |
Introduction | Why | Missions | Tutorial | FIP | Once

