Introduction | Why | Missions | Tutorial | FIP | Once
|
|
|
| Create your own mission:
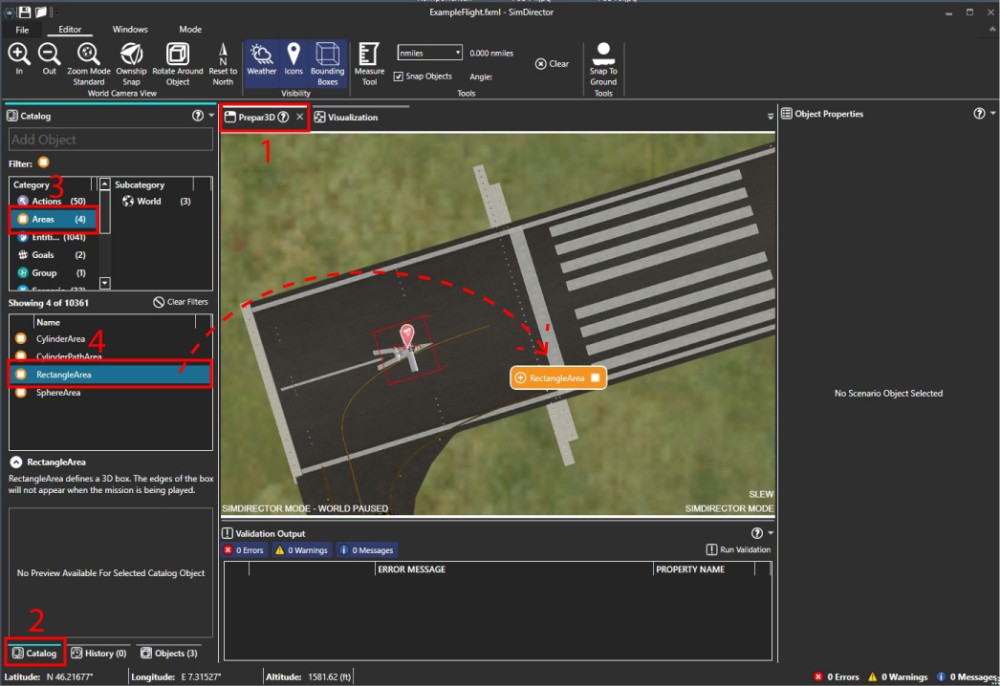
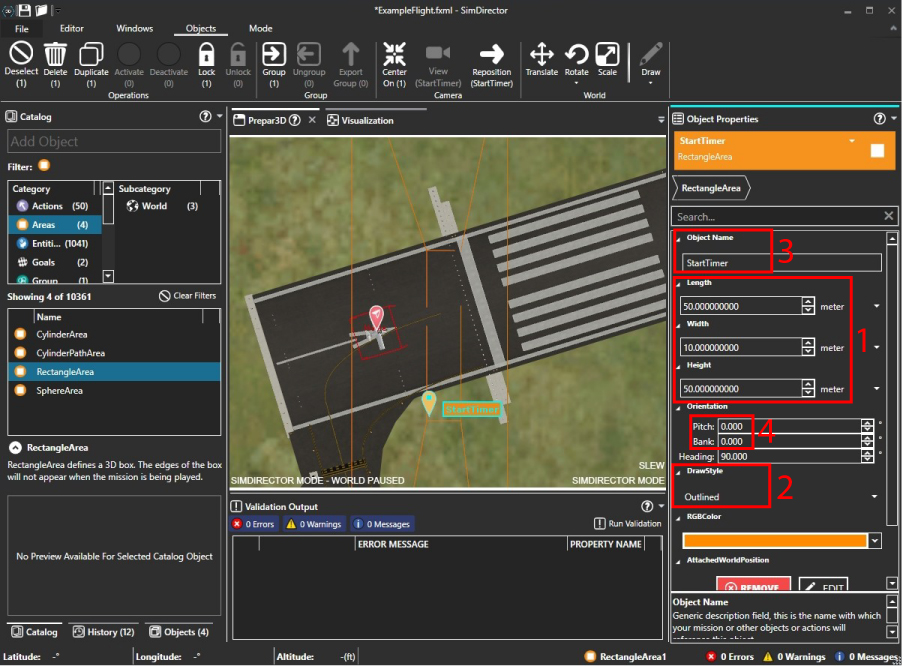
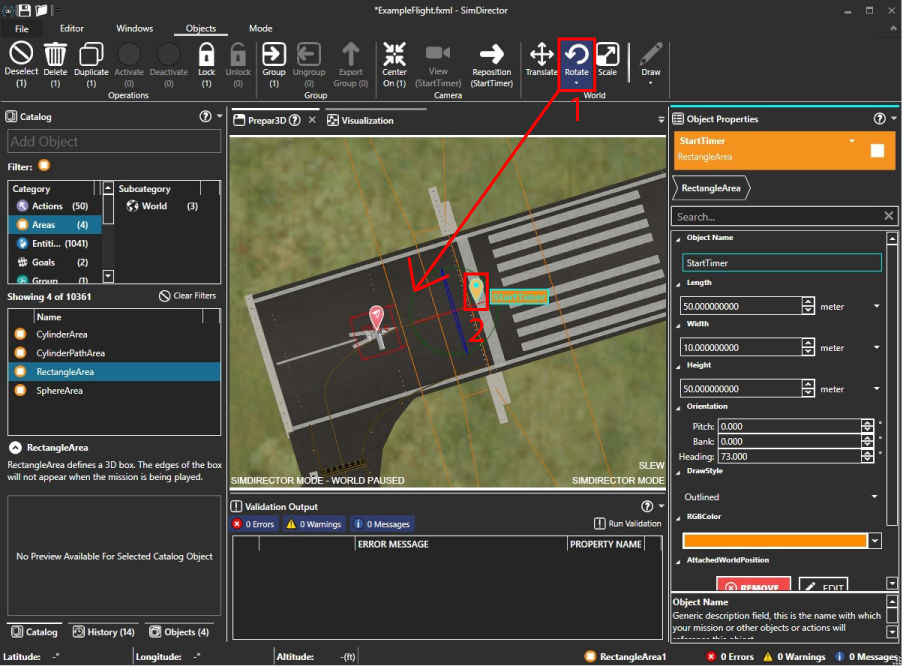
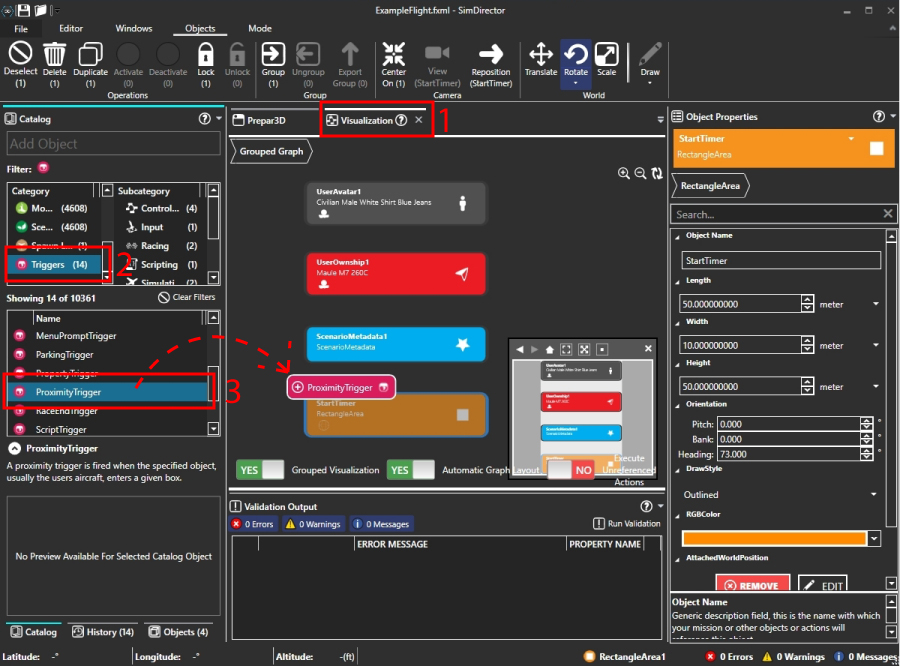
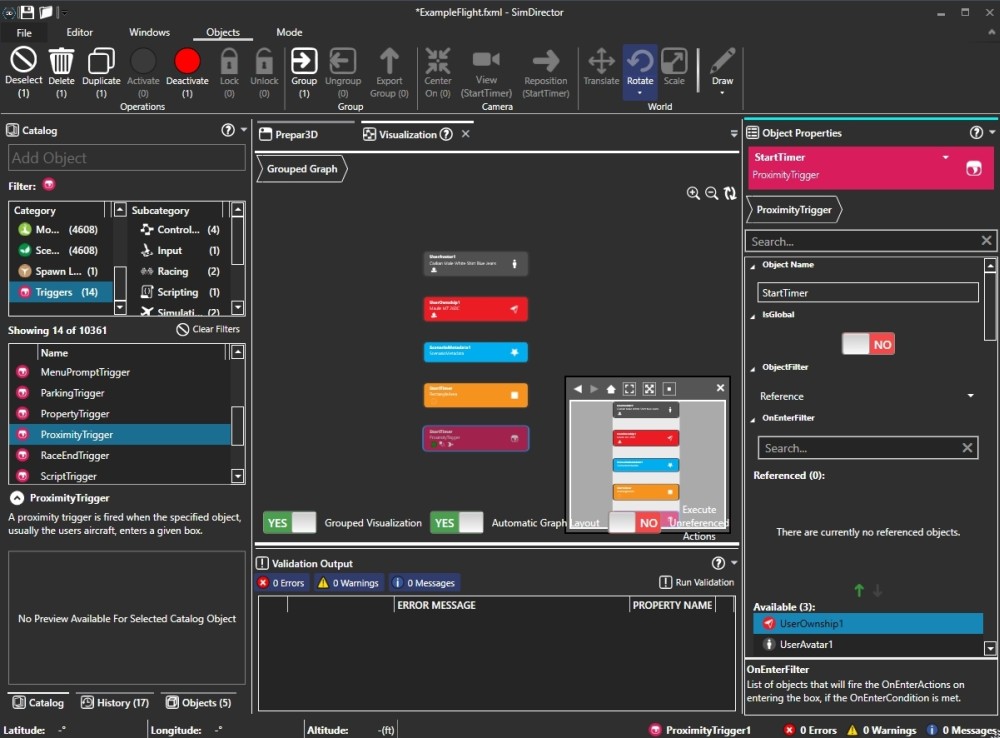
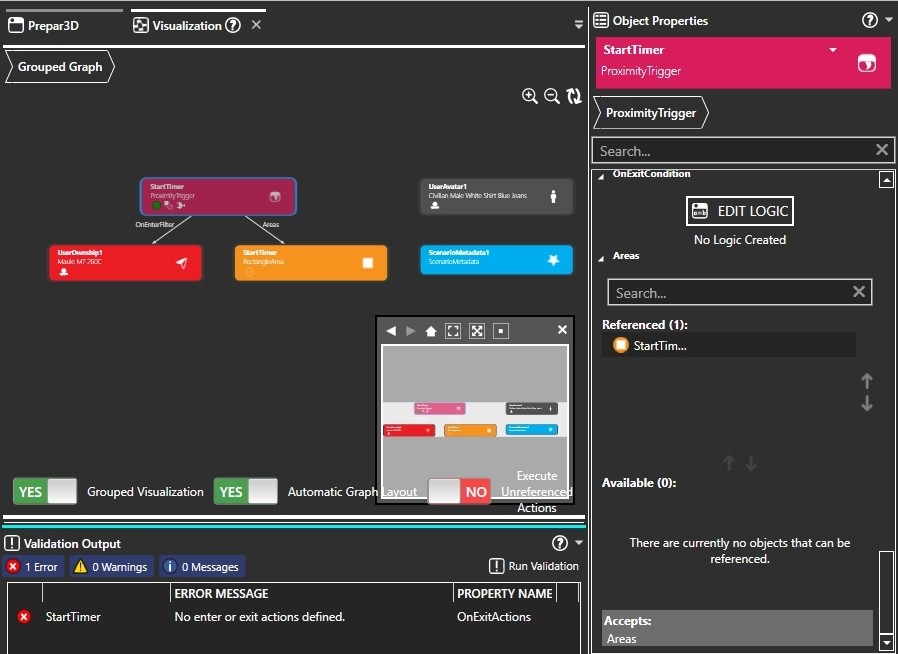
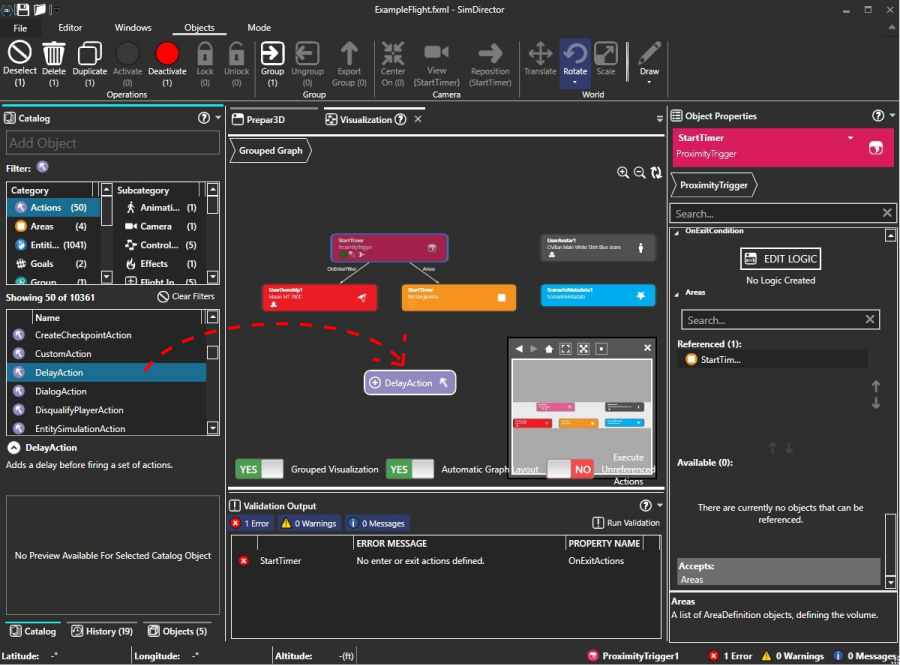
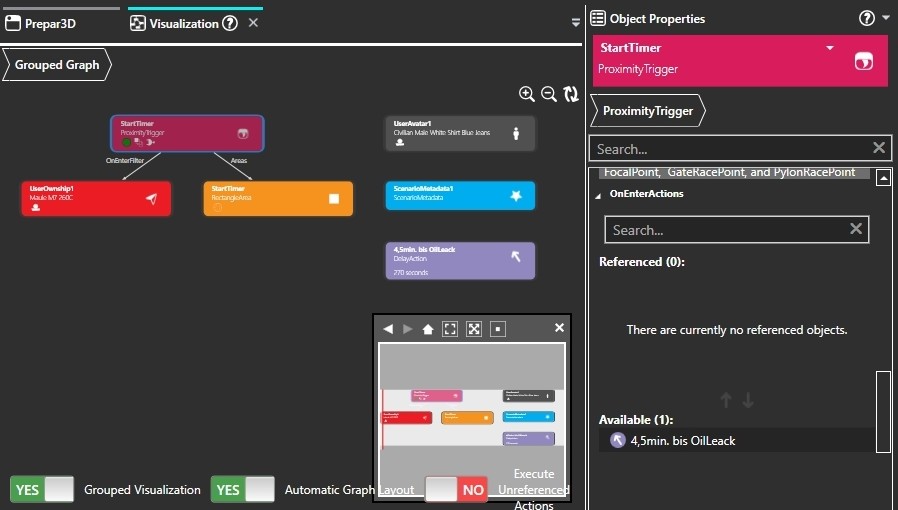
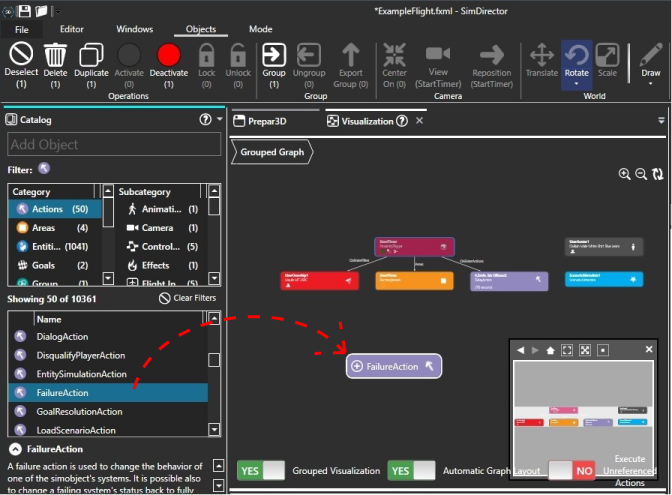
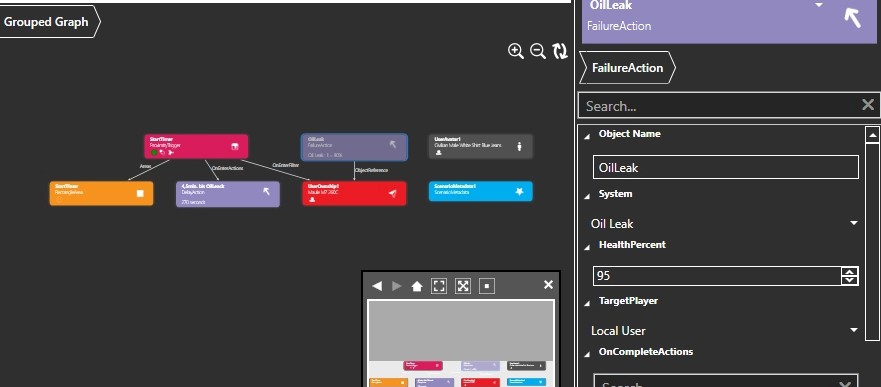
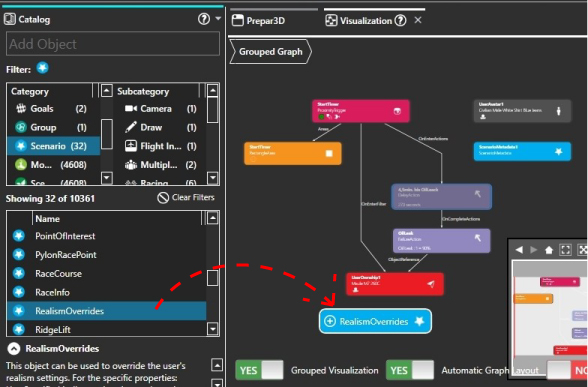
First, open the "ExampleFlightNormal" flight in Prepar3D. Important:- Select Vehicle/Failures in the menu and deactivate the "Oil Leak" in the category "Engines". Select Scenario/Save from the menu and search for the flight "ExampleFlightNormal" in the list. Click on it and you will see that the default file name (Maule M7 260C EC-527...) changes to "ExampleFlightNormal". We will save the flight under a different name: Change the Description to: Leave the checkmark at "Default", this mission will be the default flight. Now quit the Prepar3D. Open the SimDirector If you have marked the flight as default, SimDirector will start directly with this flight. At this point a short explanation of the SimDirector display: Click on "Run Validation" (1), you will notice that "ScenarioMetaData" (2) is missing. Double click this line and confirm the request with "Yes" (3). Click on the tab "Visualization" (4) You see 3 objects: UserOwnship1 (your plane), UserAvatar1 (The pilot in the plane) and ScenarioMetadata1. Switch to the tab "Prepar3D" (1) and zoom in on the plane (by turning the mouse wheel). Now we set an Area: Switch the left pane to "Catalog" (2), click on "Areas" (3) at the top and search for "RectangleArea" (4) in the window below. Click on it and drag the area into the Prepar3D window in front of the aircraft while holding down the mouse button. 1) The area is set, but much too big, so adjust the size in the window on the right: Length 50, With 10, Height 50. 2) At "DrawStyle" change from "Filled" to "Outlined". The area will be transparent, but still visible for testing in the flight simulator. As soon as the mission is finished and working, change it to "None" and the area will be invisible. 3) Give the area a meaningful name: Click at "ObjectName" in the field and write "StartTimer". 4) Make sure that "Pitch" and "Bank" are both set to "0", otherwise the Ares will hang crooked (marked red). 1) The area must be positioned correctly, so click on "Rotate" and turn the area at the green circle to the right angle to the runway (Heading ca 73). Red and blue circles change pitch and bank, so leave them unchanged. Then click on "Rotate*" again to deactivate the mode. 2) If the area needs to be moved, click on the orange drop and drag the area to the desired position with the mouse button pressed. The area is positioned, now you have to define what should happen when the plane rolls into the area. Switch to "Visualization" (1), find the "Triggers" (2) in the upper right window under "Category", click on it and find the "ProximityTrigger" (3) in the window below. Hold down the mouse button and drag the trigger into the visualization window. Enter a meaningful name in the right window under "ObjectName", e.g. "StartTimer". The trigger needs a reference so that it knows when it has to fire. So double click under "OnEnterFilter", "Available" the line "UserOwnship1". UserOwnship1 moves to the top of the "Referenced" field. In Visualization window you see a connection between ProximityTrigger and UserOwnship1 (1). Scroll down in the right window to the "Areas" (2). Here you have to tell the trigger when to fire. Double click on the Available area "StartTimer" (3). "StartTimer" has moved to the top and the trigger has connected to the area in the visualization window. Now click on "Run Validation" and you will see that the mission has an error: The trigger is missing an action it should take when the plane rolls into the area. Search for "Actions" in the upper left window under "Category" and click on it. In the window below find the "DelayAction" and drag it into the visualization window with the mouse button held down. Give the action a meaningful name in the right window under "ObjectName", e.g. "4.5min. to OilLeak". In the field "DelaySeconds" type 270 (4,5min. = 4x60sec. + 30sec. = 270sec.). Now click on the ProximityTrigger in the visualization window. In the window on the right scroll down and look for the item "OnEnterAction". Under "Available" double click on the action "4,5min. to OilLeack", this action moves to the top. In the visualization window you see that the trigger is connected to the DelayAction. The trigger fires when the aircraft rolls into the area and activates the DelayAction, which runs for 270 seconds. After this time, the action must trigger the oil leak. So we need another Action: Search in the window on the left under "Categorie" / "Actions", the "FailureAction", and drag it into the visualization window with the mouse button held down. Give the FailureAction the name "OilLeak". Scroll all the way up again and look for "Oil Leak" under the "System" heading. Unfortunately, the P3d makers introduced a new, dark color scheme in P3dV6 and forgot to adjust this menu. That's why there is white writing, on a white background, so it's not readable. But if you move the mouse over the menu, the current item becomes blue and thus readable. Oil leak is selected, now you have to determine how big the leak is. So set 95 under "HealtPercent". 100 = no leak, 0 = largest possible leak (oil leaked in 20 seconds). The DelayAction must be linked to the FailureAction. So click on the DelayAction in the visualization window and double click on the "Oil Leak Action" in the right window under "OnCompleteActions". One important object is still missing: In the left window, under "Category", find the item "Scenario". In the window below, drag and drop the "RealismOverrides" into the visualization window. Here you set the "amount" of autogen, scenery details and water effect for this mission (0-7). This is important if you give your mission to other users and plan to land in the terrain. You may have Autogen set to 2, so you can land on open ground. If the other user has autogen set to max (7), the planned landing area will be overgrown with trees and bushes. You also determine whether changes to the flight are allowed. So things like aircraft type, aircraft load, weather settings, airport selection and flight planner. Set the following:- FlyingTips: Enable (This will tell you, for example, if the mixture is not sufficiently leaned). Done! Save the flight (disk icon in the upper left corner) and exit SimDirector with the "x" in the upper right corner. Now start the Prepar3D and test the mission. Once the oil leak occurs, you have about 10 minutes until the engine fails. There are now 4 files in the save directory: If you don't want to rebuild all this, but you are curious about the result, you can download this zip and copy the contained 3 files into your storage directory. |
|
|
This is how it continues: Expand the mission
|
|
|
I hope you enjoy these flights, if so, please give feedback to p3d@andi20.ch. Also send error messages (spelling mistakes, wrong information, etc.) to me, I appreciate any feedback. |
|
| Introduction | FlightCreate | MissionCreate | MissionExpand | MissionComplete ||||| MissionExpand 1 | 2 | 3 | 4 | 5 | 6 |
Introduction | Why | Missions | Tutorial | FIP | Once


